What You Need to Know About Digital Stitch Design Files
Embroidery looks simple when you see the final result. A logo sits neat on a shirt. A name looks clean on a cap. But behind that neat look is a digital stitch file. Without the right file, the machine cannot do its job.
Many people hear the term Embroidery File Format but do not fully understand what it means. It is not just a file type. It is the full stitch plan that guides the machine. If this file is made well, your design will stitch smooth. If it is made poorly, you will face thread breaks, gaps, and fabric pull.
I have worked in embroidery for many years. I have tested files on many fabrics. I have fixed designs that failed in the middle of a job. In this guide, I will share clear and simple facts. I will explain what these files are, why they matter, and how to use them the right way.
Let us start with the basics.
What Is a Digital Stitch Design File?
A digital stitch file is not a photo.
It is not a JPG.
It is not a PNG.
It is not a PDF.
It is a special file made for embroidery machines.
This file tells the machine:
-
Where to move the needle
-
When to change thread
-
How fast to stitch
-
Where to stop
It works like a road map.
The machine reads this map and follows it step by step.
Why Stitch Files Are So Important
If the stitch file is not correct, the design will fail.
You may see:
-
Loose threads
-
Gaps in fill
-
Uneven letters
-
Wrinkled fabric
A good file prevents these issues.
From my real work, I can say that most stitch problems come from poor digitizing. The machine only follows what the file tells it to do.
So the file is the heart of embroidery.
Common Types of Stitch Files
Different machines use different file types.
You must match the file to your machine.
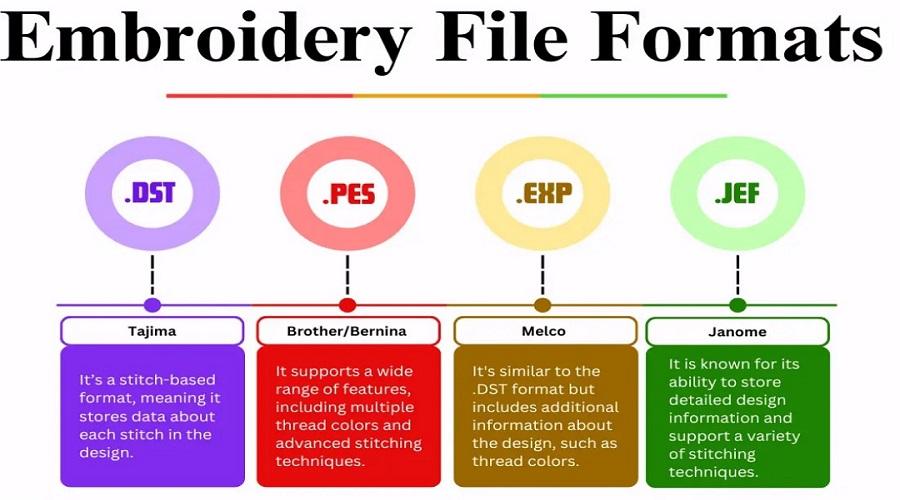
DST File
DST is one of the most common formats.
Many commercial machines use it.
It stores basic stitch data.
It does not always store thread color names.
But it is strong and simple.
PES File
PES is used by many home embroidery machines.
It supports color details.
It is common in small shops.
JEF File
JEF works with many Janome machines.
It holds stitch and color data.
It is clean and easy to use.
EXP File
EXP is used in some commercial systems.
It stores simple stitch commands.
It is light and fast.
Why File Type Must Match the Machine
Each machine brand reads a specific format.
If you load the wrong type, the machine may not open it.
Always check your machine manual.
Using the correct file type saves time and stress.
How a Stitch File Is Created
The process is called digitizing.
Digitizing is not the same as graphic design.
It is not just drawing shapes.
It is planning stitches.
Step 1: Study the Artwork
The digitizer looks at:
-
Size
-
Shape
-
Detail
-
Fabric type
Not every design works well in thread.
Small text and thin lines may need changes.
Step 2: Choose Stitch Types
There are three main stitch types.
Run Stitch
Used for fine lines.
Good for detail work.
Satin Stitch
Used for text and borders.
Best for medium shapes.
Fill Stitch
Used for large areas.
Covers space with rows of stitches.
Each part of the design must use the right stitch type.
Step 3: Set Stitch Density
Density means how close stitches are placed.
Too many stitches make fabric stiff.
Too few stitches leave gaps.
Balance is key.
Fabric type changes density needs.
Cotton is soft.
Denim is thick.
Caps are firm.
Each needs different settings.
Step 4: Add Underlay
Underlay is a base stitch.
It supports the top stitches.
It helps reduce puckering.
It improves stitch quality.
Never skip underlay.
Step 5: Plan Stitch Path
Path order controls stitch sequence.
Good path order:
-
Reduces thread trims
-
Saves time
-
Makes design smooth
Bad path order creates messy results.
I always check the stitch preview before final save.
Fabric Plays a Big Role
Fabric changes everything.
Thin Fabric
Needs light density.
May need extra support.
Thick Fabric
Needs less density.
But strong underlay.
Stretch Fabric
Needs special care.
Wrong settings cause pull.
Always match the stitch file to the fabric.
Stitch Count and Why It Matters
Stitch count is the total number of stitches in a design.
High stitch count means:
-
Longer run time
-
More thread use
But low stitch count is not always good.
Too low can cause weak coverage.
A smart digitizer finds balance.
Common Problems in Poor Stitch Files
I have fixed many bad files. Here are common issues.
Thread Breaks
Often caused by high density.
Or sharp stitch angles.
Gaps in Fill
Caused by low density.
Or poor underlay.
Misaligned Design
Caused by bad path planning.
Fabric Puckering
Caused by tight stitches.
Or no stabilizer support.
Most of these problems start with the file.
Why Experience Matters in Digitizing
Software is only a tool.
Skill comes from practice.
A trained digitizer understands:
-
Thread behavior
-
Fabric stretch
-
Machine movement
From my years of work, I have learned that small changes make big differences.
Even a slight change in stitch angle can improve the look.
Can You Edit Stitch Files Later?
Editing stitch files is not easy.
They are not like photo files.
Resizing too much can damage stitch balance.
Small size changes are fine.
Big changes require re-digitizing.
Always keep the original editable file.
Tips for Choosing a Good Stitch File Service
If you plan to hire a digitizer, look for these signs.
They Ask About Fabric
Fabric type matters.
If they do not ask, be careful.
They Offer Revisions
Good services fix issues fast.
They Share Stitch Count
You should know what you are paying for.
They Show Sample Work
Past work shows skill and trust.
Trust builds long-term business.
Real Experience from My Work
I once received a logo file from a client.
It looked fine on screen.
But during stitching, the letters were tight.
The shirt fabric pulled.
I checked the file.
Density was too high.
Underlay was missing.
I rebuilt the file.
Adjusted density.
Added proper underlay.
The next stitch test was clean.
This shows how small changes improve results.
Best Practices for Digital Stitch Files
Here are simple rules I follow.
Keep Designs Clean
Remove tiny details.
Simplify shapes.
Test Before Bulk Stitching
Always run a sample first.
Testing saves money.
Use Proper Stabilizer
Even a good file needs support.
Match stabilizer to fabric.
Keep Backup Copies
Save all files safely.
Label them clearly.
Final Thoughts
Digital stitch design files are the base of machine embroidery.
They guide every stitch.
They control the final look.
A good file gives clean results.
A bad file causes stress and waste.
Always match file type to your machine.
Always think about fabric.
Always test before full production.
From my real hands-on work, I can say this with full confidence: strong stitch files build strong embroidery results.
Focus on quality.
Trust skilled digitizing.
And your designs will look neat, sharp, and professional every time.